
A properly installed compressed air system is the backbone of many industrial and commercial operations. It supplies reliable power for pneumatic tools, equipment, and processes. However, installing a compressed air system can be challenging without the right information or direction. This guide will walk you through the process of installing a compressed air system, providing helpful tips to ensure efficiency, safety, and compliance with local regulations.
What to Consider Before Installing a Compressed Air System
Installing a compressed air system requires careful planning to ensure it meets your specific operational needs. Proper planning to evaluate your space, usage requirements, and infrastructure upfront will help prevents costly adjustments or underperformance later.
- Purpose and Applications - Determine the primary use of your air compressor setup. Whether it’s operating high-demand industrial tools, smaller workshop tools, or a combination of both, understanding the load will influence your purchase.
- Space Requirements - Compressed air equipment can occupy a significant amount of space. Make sure you have sufficient space to house the compressor, storage tank (if needed), and piping. Be sure to also consider airflow and ventilation space for cooling.
- Compressed Air Flow Needs - Accurately assess your pressure and CFM requirements. Higher CFM demands require more robust compressors and possibly additional air receivers or larger pipes to maintain steady pressure.
- Electrical Requirements - Understand the electrical and power requirements of your compressed air system. Ensure your electrical system can meet the compressor’s electrical requirements.
- Local Building Codes and Safety Regulations - Always check local building codes, safety regulations, and permitting requirements. Failing to comply with regulations can result in fines, void warranties, or create unsafe operating conditions.
Tools and Equipment Needed For Installation
Before you begin installation, ensure you have the following components and tools readily available to successfully install the compressed air system:
Required Components
- Air Compressor - Ensure you have the proper air compressor for your needs. If you haven’t purchased yet, view a variety of air compressors to find the right fit. Choose between oil-lubricated or oil-free models, taking into account noise levels, maintenance, and air quality needs.
- Pipes and Fittings - Check that you have the right pipes and fittings available. Steel, copper, aluminum, or plastic: Each has pros and cons. Steel is durable but heavy and prone to corrosion if not properly treated. Copper is corrosion-resistant but can be expensive. Aluminum is lightweight and resistant to corrosion. Certain plastics (like reinforced PVC or PEX) are cost-effective and easy to work with. Aim for properly sized pipes to minimize pressure drop.
- Regulators, Dryers, and Filters - These are essential for compressed air best practices, ensuring your system delivers clean, dry, and well-regulated air. This equipment helps extend equipment life and maintain consistent performance.
- Air Storage Tanks - This may be necessary for your compressed air system to handle peak demands without sacrificing pressure.
Basic Tools
- Wrenches, Sockets, and Screwdrivers: For tightening and securing fittings.
- Pipe Cutters or Saws: Especially important for cutting metal, copper, or plastic pipes cleanly.
- Measuring Tape and Writing Utensil: To measure and mark proper pipe lengths.
- Personal Protective Equipment (PPE): Safety glasses, gloves, ear protection, and appropriate clothing.
Step-by-Step Guide to Installing a Compressed Air System
Now that you have all that is needed to complete your installation, here’s a step-by-step guide to installing a compressed air system.
Step 1: Prepare the Space
- Map Out the Layout - Find a clean, dry, and well-ventilated room to install your compressed air system. Sketch your workspace and plan the route for your pipes. Use short, direct routes to reduce pressure drops. The system should be at least two feet away from walls and corners. Keep in mind future expansions: a looped system can help distribute air more evenly.
- Place Components Strategically - Filters, Dryers, and Regulators should be easily accessible for maintenance. Drain Valves should be located at low points to remove water from the system.
- Clear the Area - Remove any obstacles and debris around the installation site. Ensure adequate ventilation and accessibility for servicing. Do not store any corrosive or toxic agents near the compressor.
- Level the Surface - Compressors must be placed on a stable, level base. An uneven surface can lead to vibration, undue wear, and hazardous noise levels.
- Adhere to Safety and Codes - Install your equipment in a designated area meeting local regulations (e.g., temperature controls, explosion-proof lights if needed).
Step 2: Assemble the System Components
- Position the Compressor - Unpack the air compressor and ensure all components are free of damage and parts are not missing. Follow the manufacturer’s instructions for proper assembly sequence. Ensure all accessories, like belts or guards, are installed correctly.
- Mount the Compressor - As reviewed above, ensure the compressor is securely mounted and level, ensuring proper ventilation.
- Connect the Air Lines - Begin connecting the airlines and fittings; ensuring a proper fit.
- Attach Filters, Dryers, and Regulators - They are typically not included with an air compressor. If you purchased these items separately, mount each component in the correct flow order. Typically, after the air leaves the compressor, it flows through the dryer, then filter, then regulator. Shop dryers and filters.
- Install the Storage Tank (If Needed) - Place it where it’s easy to monitor pressure and perform maintenance checks.
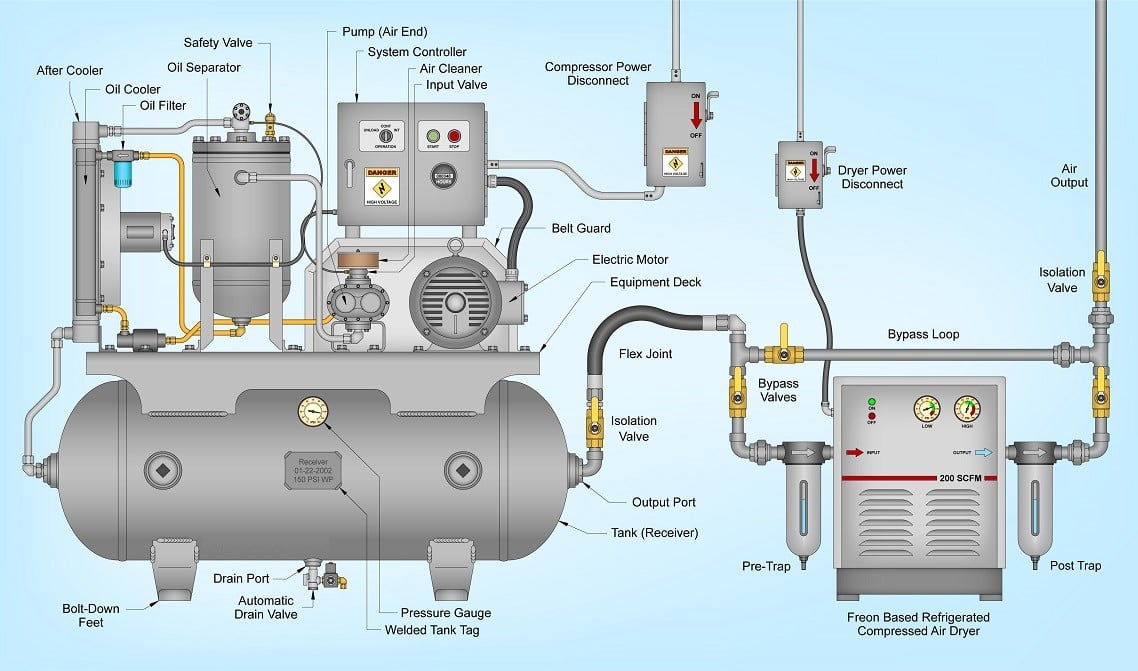
View the graphic below for an example of a typical setup of a rotary screw air compressor with an air dryer.
Step 3: Install the Air Distribution Pipelines
- Cut Pipes to Length - Measure carefully and avoid sharp edges or burrs. Proper cuts prevent leaks and damage.
- Secure Fittings - Use appropriate sealants, such as Teflon tape or pipe dope, to minimize leaks. Avoid over-tightening, which can cause cracks in pipes or fittings.
- Mount the Pipes - Use brackets or pipe hangers to support piping and reduce vibration. Maintain a slight slope toward drain points, facilitating water drainage.
Step 4: Test the System
- Check for Leaks - Pressurize the system and use a soapy water solution or leak detector to find any hissing or bubbling. Tighten or reseal leaking connections.
- Monitor Pressure Levels - Ensure the system maintains steady pressure when equipment is engaged. Run a pressure test according to the manual’s instructions.
- Adjust Regulators - Set them to the required PSI for optimal tool and equipment performance.
Common Mistakes to Avoid
- Undersizing the Compressor or Pipes: This can lead to pressure drops and reduced efficiency.
- Ignoring Condensate Drainage: Failing to regularly drain water accumulation can cause corrosion and damage, limiting the lifecycle of your equipment.
- Over-Tightening Fittings: Fittings that are too tight can crack plastic pipes or distort threads on metal fittings.
- Skipping Filter/Regulator Maintenance: Regular maintenance is key to optimally running equipment. Skipping maintenance can result in moisture or contaminants affecting tool performance.
- Non-Compliance with Regulations: Always check building codes, fire safety, or other industry-specific requirements.
Get Started Today with AirCompressors.com
By following this comprehensive guide, you’ll be well on your way to a safe, efficient, and long-lasting installation. With proper preparation, the right tools, and ongoing maintenance, your compressed air setup can serve you reliably for years to come. If you need specialized solutions, remember that professional help is just a call away at AirCompressors.com.
Utilize the educational resources from AirCompressors.com to get a foundational understanding of air compressor technology.
Ready to purchase your equipment? Browse our broad selection of equipment from compressors and dryers to filters and part kids. We have what you need for your specific projects. If you need guidance, contact our expert team to help guide you through your purchase.